Smart cards for User Impersonation
Using things the wrong way
As a professional services firm, every hour of downtime for a user costs money, so anything IT can do to reduce user disruption means (potentially) more billable hours for the firm. New hardware means a long tedious migration for the end user (the reasons thereof are beyond this particular article)
For this project, the migration process could take 8-10 hours depending on mailbox size, user profile issues, and giving time for QA. Our IT manager, being security-conscious reached out to me to discuss how to make this least disruptive. In the past, IT just had the user write-down their password so the admin could back up files, perform the upgrade or migrate to new hardware, and run QA checks on the new system to ensure everything works. His first thought was to have the user reset their password before and after the migration.
After a little discussion we agreed that this was not all that secure, since it’s still a shared password (not good) and not actually very helpful since it’s disruptive to the user (very not good).
After looking for other solutions briefly, I decided this is a singular use-case for PKI. Currently we use smart cards for some administrator accounts, but we’re looking to expand to Windows Hello for Business some time in the future, so our infrastructure is in-place.
So I struck on the idea that we (carefully) issue smart card login certificates to administrators that spoof the end user.
Now there are a number of reasons why this is a terrible idea, but very few seemed worse than a shared password (very bad) or password escrow (complicated and still not great since the password is exposed).
Requirements
There were a few major areas I wanted to focus on in this scheme—since if it works out, we’ll definitely re-use it in other situations.
- Token security and admin responsibility
- Issuance and use auditing of the certificates
- Limitation of risk if things went badly (e.g. a token is stolen or mis-used)
Setup
We currently utilize Windows 2012 R2 Active Directory Certificate Services with an Active Directory integrated CA. This is not a tutorial on setting up this infrastructure, it’s got to be done with care and purpose so I’d recommend reading up before setting up your own CA/PKI.
Windows logins with smart cards require a few pre-conditions, like Domain Controller certificates and domain configuration, but work reasonably well out of the box.
The tokens themselves needed to be easy to use and hold a number of certificates. I’ve used the Taglio PIVKey T600 USB token in the past and it seemed like a good choice for this project. USB form factor and large key storage were my main targets.
The Taglio token can hold up to 30 certificates using their minidriver. They’re relatively inexpensive, have a standard USB form-factor, and are readily available through Amazon. By default though, Windows does not see all the certificates and won’t work correctly if you don’t take specific steps to map the certificates. Fortunately the PIVKey minidriver is pretty simple to distribute as an MSI file to windows clients.
PKI Token security
The Taglio tokens are not the most flexible smart cards out there. The Java Card software they run comes with some default limitations around PIN requirements and lockout thresholds that cannot be changed. The tokens have a pre-set all “0”s pin and admin key, so you must initialize them prior to issuance to ensure the tokens are secure.
I recommend using Versasec’s vSEC:CMS tool to set the admin key to a random value and securely storing that somewhere. It’s a nice advantage to be able to un-block the card in the event of a PIN lockout.
Be sure to delete the default self-signed certificate on the token while you’re initializing them since you’ll be issuing your own.
Older versions of the Taglio command-line admin tools treat the admin key differently than vSEC so only use one or the other when setting or recovering the admin key! Worse yet, the admin key has no way to reset so blocking the admin key essentially makes PIN reset impossible.
The Javacard operating system does not support changing the PIN policy, so you’re stuck with 6-8 characters and 10 tries until lockout. For me this is acceptable due to the manual issuance and limited use of the tokens.
Issuance Restrictions and Auditing
Since Windows 2008, the ADCS role has supported restricted enrollment agents. I highly recommend taking advantage of this; by default an enrollment agent can enroll a smart card for any user (including domain admins). Limiting what users can have certificates issued on their behalf significantly limits risk.
Unfortunately as far as I can tell, the enrollment agent can’t be stopped from issuing certificates to themselves, so there is some separation of duties I can’t quite overcome. Fortunately the agents will be limited to a few trusted managers who hopefully understand the importance of proper policy.
Auditing AD Certificate Services is built-in to the Windows role, but must be activated both in Group Policy (the Advanced Audit settings must audit object access for Certification Services) AND the CA snap-in must be configured to enable auditing of specific certificate events. These events then make their way to the Windows Security event log for easy audit.
Windows event 4887 logs the Subject and Requester so we can track who issued a certificate and when. To make sure your templates are being used the CA issues event ID [???] indicating it loaded a template for the request.
Since ADCS lacks a remote issuance capability for signature-required requests1, I can force all issuance to be in-person.
Risk limitation
How can I limit the consequences and chances of misuse, abuse, or exploitation of this scheme?
-
Certificate lifetimes: I very much wanted this to be an ephemeral solution that self-cancels, which PKI lends itself to nicely. I created policies on certificate templates that specify expiration time in just 3 days to give admins time to use the logins but not take so long that there’s a risk of continuing access. Also, make sure to uncheck ‘publish certificate in AD’ on the template. Since these are temp certificates there’s no need to publish them.
-
Revocation: We do have the ability to revoke the certificate from the CA to disable it. This requires forcing CRL checking in Windows login [citation needed] so the certificate can’t be used if it’s revoked. Also a robust configuration using published CRL and OSCP helps close the gap quickly, since these revocation lists are not published in real-time.
-
Token loss: because the certificates are short-term, I’m not as concerned with loss and mis-use by external parties, but we do have the option of revocation. One blind spot that I’d like to improve is creating an automatic correlation of issued certificate to physical token, so I can positively revoke all the certificates on a lost token.
-
Collusion and mis-use of certificates: I’ve deliberately separated roles of issuers and users, so the admins themselves cannot issue certificates. Frequent audits of certificate issuance and spot-checking against the schedule of use (or a ticketing system) will help reveal mis-use by administrators.
-
Mis-use of smart card logins: Windows event 4768 indicates when smart card interactive logins against domain controllers occur. When a smart card is used for login, this event contains certificate information (CertIssuerName, CertThumbprint, etc). Correlating between authorized activity and these login events should show when unauthorized logins occur.
Limitations
Smart Cards have several drawbacks:
- Password-only integrations do not work. Some systems require passwords for authentication, and while we’re working to eliminate those one or two still exist and can’t be tested without the user’s password. Fortunately most services are Windows-integrated so Kerberos allows the login and doesn’t usually care if it’s password or smart card-based.
- Remote access support sessions are more complicated. Smart card passthrough only works in limited situations, like Remote Desktop, but several remote admin tools do not pass-through the smart card. This is a limited issue at the moment, since the cards are intended for local logins.
- Offline logins may not work (i.e. cached credentials) for smart cards since Windows tries to check the CRL or OCSP location to ensure the certificate is not compromised. Because our internal CA is not exposed to the Internet, a workstation needs to establish VPN if it’s off premises.
Conclusion
Hopefully this illustrates a slightly different use-case from the usual PKI/smart card login situation. It’s not typical to want to ‘spoof’ users in most situations, but with proper controls and management approval we achieve a better outcome for the end users.
This also seems like an awful lot of work just to prevent a little user disruption, but when the average bill rate is upwards of 250$ per hour, saving even 30 minutes per user due to password disruption for 1200 users is saving the firm potentially 150,000$ for just one project. The token cost and time spent setting this up is trivial compared to that for just one migration project. In addition we can re-use this use-case to help speed other admin tasks while maintaining “do not share your password” and “keep user credentials secure” goals.
Personally I try to consider PKI solutions whenever possible, using them in as many situations as possible both improves my knowledge but also encourages vendors and other administrators to use them as well.
-
Ok this is not strictly true, you can use certutil to create and send CSRs, sign requests, and issue the certificates remotely to a smart card, but it’s an enormous pain in the ass. ↩
My First Trick
For my first trick
I decided to abandon anything related to blogging and try something new, both as a learning exercise and an excuse to get a fancy iPad Pro and keyboard.
IOS is a bit of a mystery to me, since I’ve been an Android user for a long time, eschewing the security and consistency for flexibility (or so I thought).
Anyhow the iPad’s learning curve—especially for how to share files—was steep for me.
Fortunately this post really drove me to the right way to get up and running.
I knew I wanted to use github pages, since it’s free, static, and flexible (you see a theme with my thinking here?).
The combination of Working Copy and Github is pretty amazing once you get the hang of it, and I highly recommend both.
Request Tracker SSO configuration
This is a pretty old post but some might find it useful!
I really like Request Tracker from bestpractical, it’s the only request/ticketing system that fits the way I work (everything is in email!). It’s also super lightweight and very extensible (provided you can climb the perl learning curve). Despite nearly everything being done in email, there is usually some reason you’ll need to login to the interface. I hate forcing users to have separate passwords, and since I’ve got ADFS and active directory, there’s no reason they shouldn’t use their AD login to access it.
This is a little write-up is my experience getting SSO (microsoft ADFS, to be specific) to work to login users ‘automatically’ as well as provide a backup username/password option (since you’ll want to get to the ‘root’ account from time to time).
Environment
I’m using RT 4.4, CentOS 7, and Apache httpd 2.4 for the server side, and ADFS 3.0 (windows 2012 R2), so your mileage may vary using different distributions or versions of ADFS. I’d initially tried using nginx because I prefer its speed and simplicity, but there are no good supported SAML providers for it. Also most RT documentation is written as if Apache is used. As anything else in technology, there are dozens of ways to skin this cat depending on your situation. RT has a couple of different providers on their github that might suit you better:
I used SAML/ADFS because that’s what I use to federate my other applications. I’m quickly beginning to see the need for a general-purpose Windows-based OpenID provider, but it looks like Azure Active Directory may have this feature before ADFS does (if it ever gets it). I may eventually revisit this and use Azure AD as the login (since it supposedly supports OAuth2
The downside to my approach is its reliance on the webserver config vs. native RT configuration for everything. Troubleshooting becomes an exercise in server administration as well as application administration. However, I think the developers behind Mellon probably have a larger installbase than an RT plugin used by a small handful of folks, so I’m more likely to encounter bugfixes and updates (plus in CentOS, Mellon is installed using a package manager). Using a well-established Apache plugin seems reasonably secure.
Architecture
At a very high level this works by extending RT’s login page to include a redirect to our SAML endpoint (a virtual directory that activates the Mellon SAML plugin). The SAML endpoint then hands off the browser to the user’s ADFS to perform authentication and create an ‘assertion’ or message back to the Mellon endpoint that the user is authenticated and has attributes. The assertion is sent in the SAML response via redirect back to Mellon. Finally Mellon sets the REMOTE_USER variable in the web session based on the identity returned by ADFS. RT looks for this variable and uses it to identify the authorized user.
Configuration
Apache Configuration
Apache needs a number of extensions to work correctly, and I’m assuming you’ve already got RT up and running with standard user/password login.
- mod_auth_mellon - SAML SP provider for apache that supports single IdP configurations.
- mod_fcgid - fast CGI manager for RT’s fcgi server. For a standalone one-server RT instance, this is fine.
- mod_ssl - always try to run services over TLS
Mellon and Apache are where the action happens in this configuration. Making them play together actually turned out a little easi er than I thought. Mellon’s configuration is about as complicated as most other SAML providers and requires a bit of background in SAML to use.
Essentially SAML is a protocol for having a third-party handle authentication and send you a cryptographically-signed assertion that the user authenticated successfully and has certain attributes (such as email address, group memberships, fullnames, etc). The federation is built by exchanging metadata from the SP and IdP so they know what to expect and how to authenticate each other. Mellon acts as a service provider, con suming an IdP assertion to authorize a user.
If you installed mellon using a package (and please do), there will be a script supplied in /usr/libexec/mod_auth_mellon to generate your metadata, certificate, and private key files. The script also outputs the ‘endpoints’ or URL’s you’ll need to actually use the authentication service. Keep this output since it’ll be useful when configuring ADFS.
./mellon_create_metadata.sh "myRTinstance" "https://rt.example.com/auth"
Your entity ID is simply an arbitrary unique name that won’t conflict with any other names in ADFS. It can be pretty much any string of characters. The second parameter is the URL of the Mellon trusted endpoint. Make sure this doesn’t conflict with any directories or virtual locations in RT or Apache.
RT Authentication virtual directory
The core virtualserver configuration for RT on Apache (at least in my setup) is under /etc/httpd/conf.d/ssl.conf. The location is set to allow all users without requiring webserver-based authentication. I’m assuming this is where you’ve got your scriptroot for FCGI as well.
The configuration parameters you’ll need to look at are:
MellonEnable "info"
This sets the Mellon authentication to ‘info’ mode, which passes through the SAML-provided values if SAML authentication has occurred, but otherwise is inactive if no SAML authentication has occurred. This way RT can process the authentication if needed without requiring SSO.
MellonSPMetad "/etc/httpd/mellon/myRTinstance_metadata.xml"
MellonSPPrivate "/etc/httpd/mellon/myRTinstance.key"
MellonSPC "/etc/httpd/mellon/myRTinstance_metadata.cert"
These correspond to the metadata, certificate, and private key created by the mellon_create_metadata script and moved by you into a corresponding directory. Important to make sure the .key file can only be read by root.
MellonEndpointPath "path/auth"
This is the relative path of the Mellon endpoint you configured in the metadata script - NOTE: we may need to whitelist this in the RT configuration when converting to a plugin.
MellonIdPMetad "/etc/httpd/mellon/adfs.xml"
MellonIdPPublic "/etc/httpd/mellon/adfs.pem"
These you’ll need to obtain your metadata XML and public signing cert from your ADFS server and place on the filesystem of the RT server (see ADFS configuration below)
MellonSignatureMethod sha256
This sets the signature to SHA256, which is the default for ADFS
Finally we have the ‘auth’ endpoint we’re using for Mellon authentication. Set the directory security to ensure ‘satisfy any’ allows access from any client and disable Mellon authentication.
<Location path/auth/>
    AuthType "Mellon"
    MellonEnable "off"
    Order Deny,Allow
    Allow from all
    Satisfy any
</location>
ADFS Configuration
Mellon Config with ADFS Metadata
To configure Mellon, you need your XML from the IdP you’re using. For ADFS, the default URL is below, just browse and save the XML file
https://<your ADFS Server>/FederationMetadata/2007-06/FederationMetadata.xml
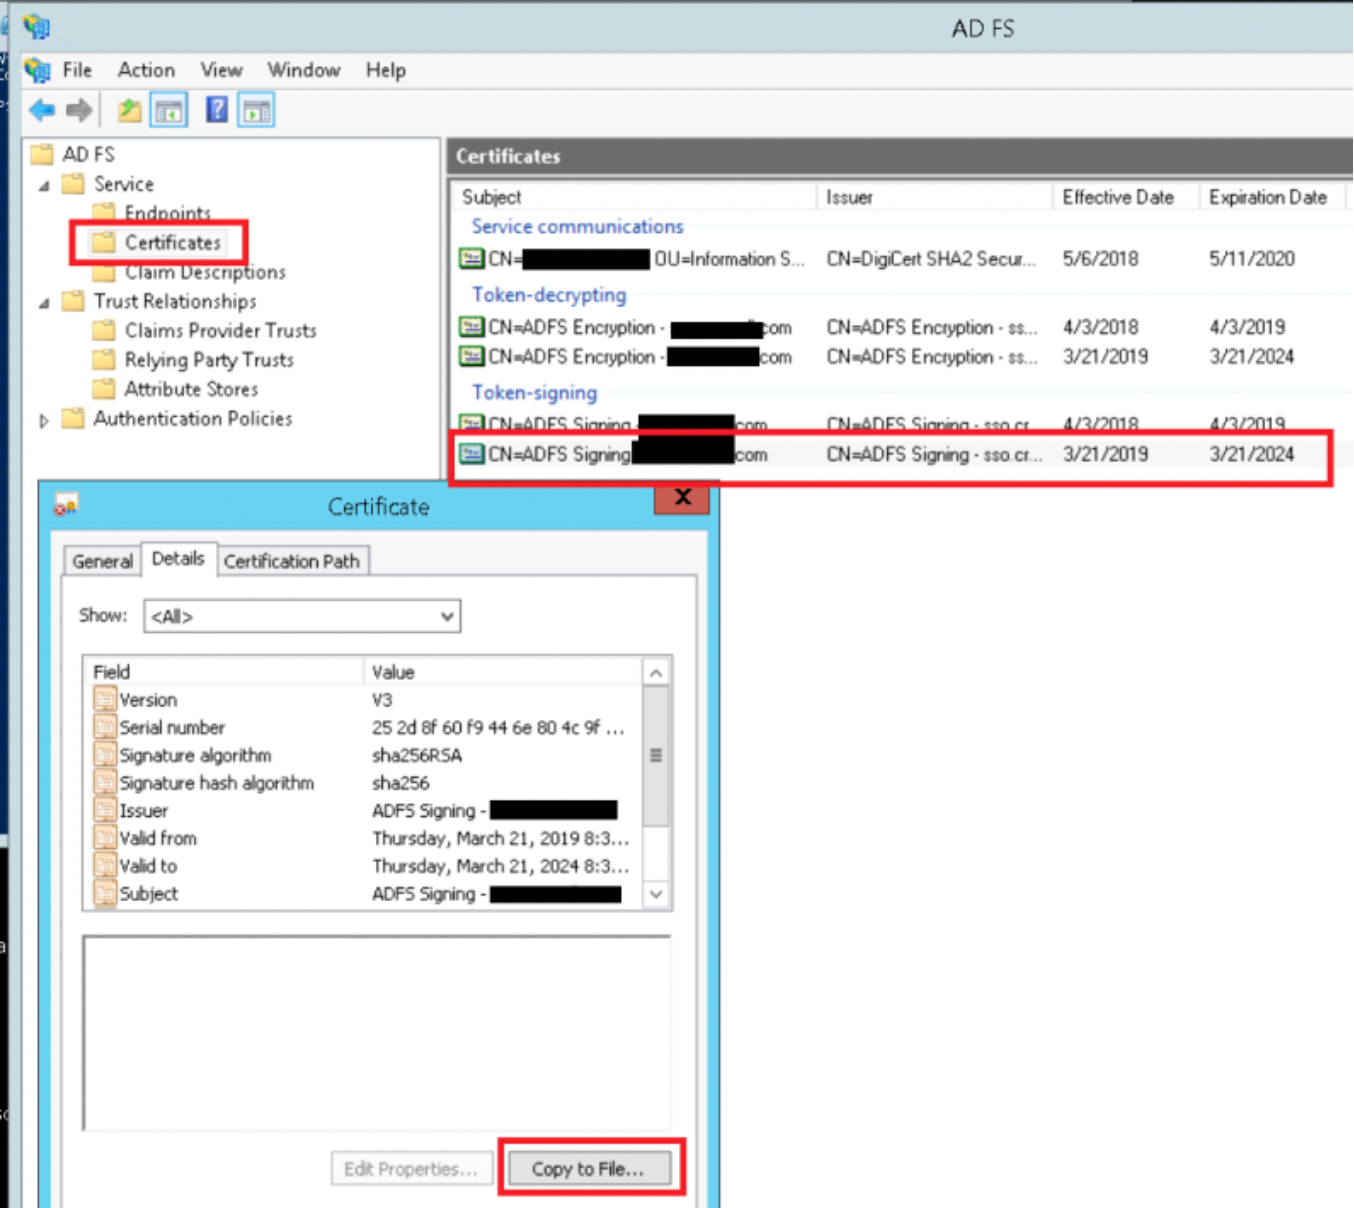
You’ll also need to copy your ADFS server’s public signing certificate as a PEM (base64-encoded) file to import into Mellon. The best place to get this is directly from the server (ADFS > Service > Certificates) open the current Token-signing certificate, select Details then Copy to file. Select base64-encoded and save to your filesystem.
Copy these two files to somewhere the webserver can read from them (I put them in /etc/httpd/mellon)
Configure ADFS
In most cases ADFS can import the metadata XML and pre-populate the SP (or Relying Party, in ADFS terms) relationship. This doesn’t work with Mellon’s XML, but fortunately the configuration’s relatively easy. I’m assuming your endpoint will be called ‘myRTinstance’ and the endpoint URL will be yourserver/auth. After running the mellon_create_metadata.sh, the endpoints are shown, which you’ll need to setup the trust in ADFS:
$ ./mellon_create_metadata.sh "myRTinstance" "https://rt.example.com/auth"
Output files:
Private key:                            myRTinstance.key
Certificate:                            myRTinstance.cert
Metadata:                               myRTinstance.xml
Host:                                   rt.example.com
Endpoints:
SingleLogoutService (SOAP):             https://rt.example.com/auth/logout
SingleLogoutService (HTTP-Redirect):    https://rt.example.com/auth/logout
AssertionConsumerService (HTTP-POST):   https://rt.example.com/auth/postResponse
AssertionConsumerService (HTTP-Artifact):   https://rt.example.com/auth/artifactResponse
AssertionConsumerService (PAOS):        https://rt.example.com/auth/paosResponse
Copy the Certificate generated to your ADFS server (it’s just plan text, so you can copy and paste into notepad if needed).
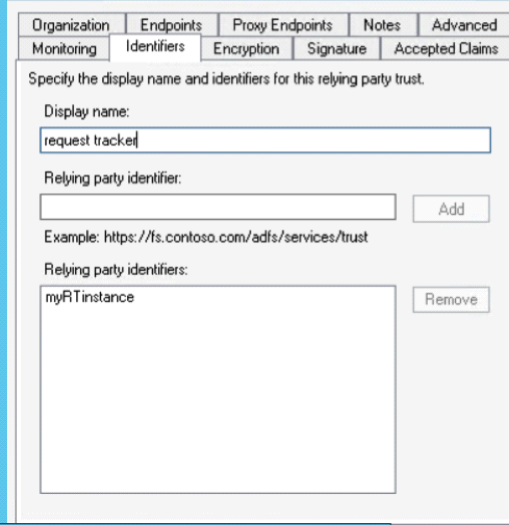
Create a new Relying Party Trust and choose to enter the data manually. Create the trust as an ‘AD FS profile’, do not check WS Federation or SAML WebSSO URLs, use the identifier above (myRTinstance , in this case), do not configure multi-factor, permit all users to access the relying party. Create the RP and view the properties to verify it below:
Select the Identifiers tab. Enter an appropriate Display name (this is only local to ADFS). Enter the first parameter you used for the create metatdata script (in this case ‘myRTinstance’) as the Relying party identifier and click Add:
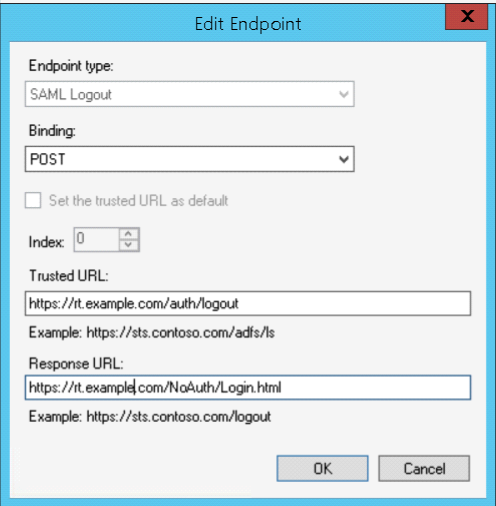
Select the Endpoints tab and click Add SAML… select Endpoint Type of ‘SAML Assertion Consumer then enter the AssertionConsumerService (HTTP-POST) URL you got from the metadata creation script

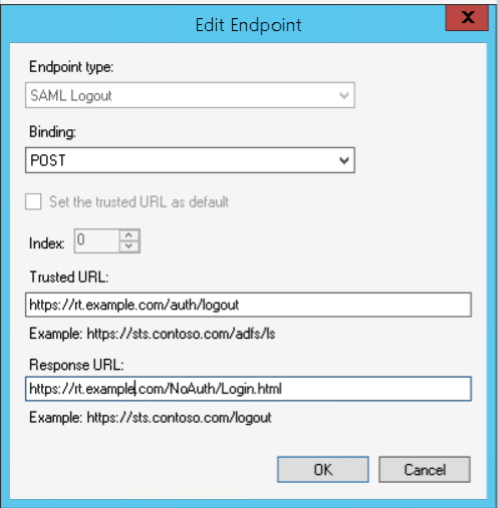
Add another endpoint for logout (see Logout below). Note the difference between the trusted URL (which is the logout endpoint of the Mellon endpoint) and the Response URL which is the return to RT’s login page.
Finally select the Signature tab and import the Certificate that Mellon created.
ADFS Claims Rules
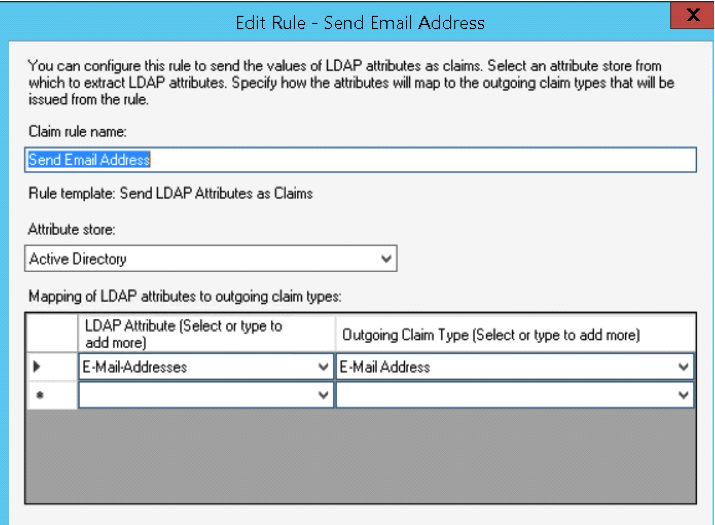
Once you’ve configured the association, you’ll need to add claims rules which specify how ADFS sends information to the SP, like what format and information to include in the assertion. Since RT is almost always based on email address, we’ll use that as our NameID for simplicity sake.
Select your RP and click Edit Claim Rules. We’ll need to create two rules, one that selects the email address from LDAP (Active Directory) and the next that transforms the email address into the name ID:
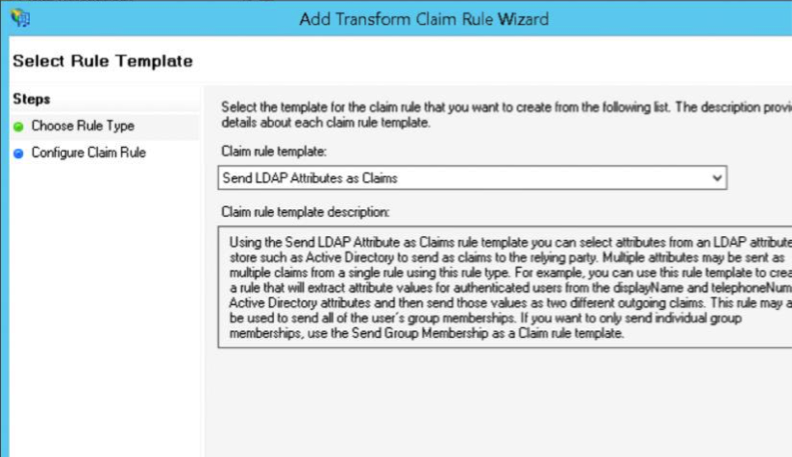
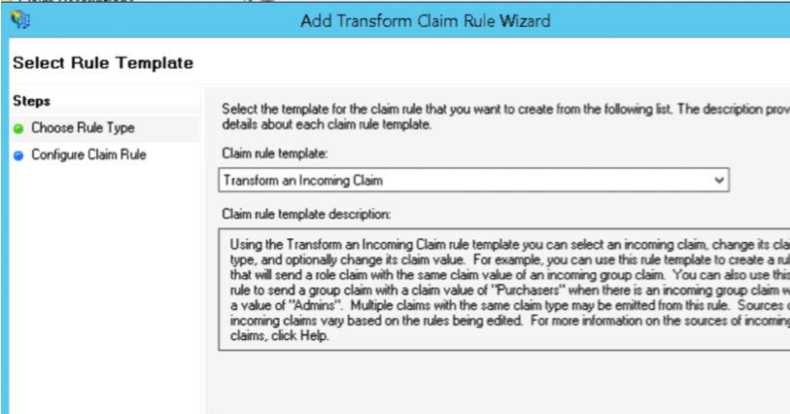
 Then create a rule to Transform an Incoming Claim:
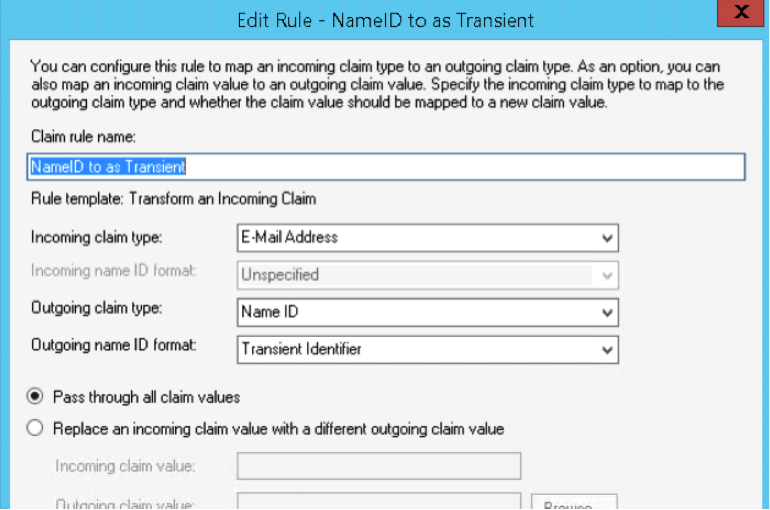
It’s very important to use ‘transient identifier’ as the outgoing nameID format, since that’s what Mellon uses by default to consume the NameID and identify the user.
You can add additional claims rules to pass through groups, phone numbers, or pretty much anything else stored in AD.
Troubleshooting SAML
I highly recommend using a SAML aware plugin like SAML Message Decoder for your browser (chrome and firefox versions of the plugins are available). This way you can see if there are errors between ADFS and your Mellon configuration.
Things to look for:
<Subject> <NameID Format="urn:oasis:names:tc:SAML:2.0:nameid-format:transient">user@domain.com</NameID>
The NameID is the most important parameter. This is your user ID according to SAML and most often corresponds to an email address. The format must match on both sides of the federation. For historical reasons, I recommend transient, since it’s Mellon’s default format. When you’re using ADFS the default NameID is your Windows login name (DOMAIN\user) and if you’ve misconfigured the claim rules above, you’ll probably get these errors.
<samlp:Status> <samlp:StatusCode Value="urn:oasis:names:tc:SAML:2.0:status:Success" /></samlp:Status>
StatusCode generally describes the status or error that occurred. Most often these are invalidNameIDFormat which indicates the NameID format does not match
RT Configuration
RT is pretty much an out-of-the box configuration with external authentication and fallback to RT login configured. External auth should be included in RT4.4 so no additional modules are necessary. This provides us with a lot of flexibility in authenticating the user (either pass through REMOTE_USER or try a login form). RT handles the authenticated session internally, so it can act independently of the webserver’s authentication if needed. I’m assuming you’ve setup RT to the point where you can login to it. I’m also assuming you’re running RT under the root directory, so if you’re running under /rt or some other directory be sure modify those values below.
RT Authentication Configuration
In RT_SiteConfig.pm make sure WebRemoteUserAuth and WebFallbacktoRTLogin are enabled:
Set( $WebRemoteUserAuth, 1);
Set( $WebFallbackToRTLogin, 1);
Optionally, you can set web remote user autocreate. This may be relatively safe since you are authenticating users against an IdP that you own, so presumably everyone who authenticates is a user you know. This could probably be expanded significantly in an extension similar to the rt-authn-OpenID module on Github.
Set($WebRemoteUserAutocreate, 1);
Also you must set your referrer whitelist to your ADFS server to allow the redirect to work properly
Set( @ReferrerWhitelist, qw(adfs.example.com:443));
Otherwise you can use RT’s built-in ExternalAuth module to import from LDAP or manually create users in RT, which giv es you the most control but is highest administrative burden (this is what I did since I only have a handful of actual RT users).
RT Login Information
RT needs a slight customization to handle the SAML login, since we want to be able to switch between RT and SAML logins. In my configuration the user is prompted for what to do and not automatically logged-in via SSO. The login override is based on the OpenID module with some modifications
The Login element (/opt/rt4/share/html/Elements) controls what’s displayed on RT’s login page, and we’re going to create a callback to Default that adds our logon button to the default login page when webremotelogin is enabled. After updating the custom callback don’t forget to clear the Mason cache (delete /opt/rt4/var/mason_data/obj/*), and restart Apache.
Create the following as the file /opt/rt4/local/html/Callbacks/SSO/Elements/Login/Default
<%init>
return unless (RT->Config->Get("WebRemoteUserAuth"));
</%init>
<h3><&|/l&>Login with <em>Windows Account</em></&></h3>
<p><% loc('Select Login with Windows to login automatically with your Windows account') %> </p>
<div class="button-row">
         <span class="input">
           <input type="button"
onclick="location.href='/auth/login?ReturnTo=/?next=<% $DECODED_ARGS->{next} %>';" class="button" value="<&|/l&>Login with Windows</&>" /></span>
</div>
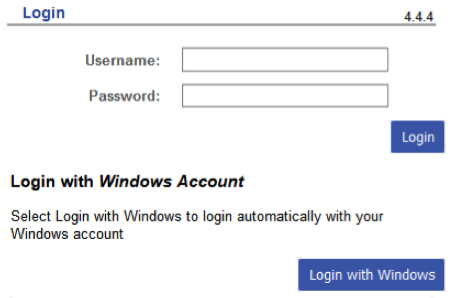
This will display the selection as an additional button and will just direct to the URL on click. The next argument is a hash of the URL the browser will return to when authentication is completed and I should probably add some checking to see if it’s null. The button is changed to type button so it doesn’t try to submit the form, just redirect to the SAML login target. If all goes well it should look like this:
Another way to handle the SAML login (if you don’t need the RT login prompt) would be to set the Require valid-user directive in Apache’s configuration and redirect to the login using an override of the 401 page. You could also handle this with a meta refresh, js refresh or redirect, or any other way to get the person to the Mellon login endpoint. Unfortunately there’s no easy way to leverage the ‘next’ querystring in this case so users will be dumped to the root after authentication rather than returning to their original link.
ErrorDocument 401 "\
<html>\
<title>Access Restricted</title>\ <body>\
<h1>Login with your Windows account.</h1>\
<p>\
<a href=\"/auth/login?ReturnTo=/\"><strong>Click here to login via single sign-on<strong>
</a><br /><br /><br />\
        </p>\
        </body>\
        </html>"
RT Logout
Logging-out requires a little more code, since you have to coordinate two systems being logged-out at the same time: RT’s internal session manager and the webserver’s REMOTE_USER variable, which is controlled by Mellon.
By default, if you click the standard logout, it clears the RT session, but refreshes back to logged-in since REMOTE_USER is still populated. Furthermore, we want to clear the SSO session at the same time, since logout in SAML should end-up on an IdP URL to really correctly clear the user’s session.
The sequence should be (technically this will be an SP-initiated logout):
- RT logout (clear RT’s session)
- Mellon logout (clear the SSO session locally)
- SAML logout (redirect the user to the logout target in the IdP)
To do this, we’ll have to create another override, this time for the Logout.html page
Note the callback called ‘beforesessiondelete’ and assuming by the name we execute our callback just before the RT session is terminated:
# Allow a callback to modify the URL we redirect to, which is useful for
# external webauth systems
$m->callback( %ARGS, CallbackName => 'ModifyLoginRedirect', URL => \$URL );
$m->callback( %ARGS, CallbackName => 'BeforeSessionDelete' );
If we override beforesessiondelete with a callback that redirects to the SP logout URL, we trigger the SP logout mechanism which clears REMOTE_USER. This elegantly clears the RT session, the Apache/Mellon session, and the IdP login session to the application!
Create the following file /opt/rt4/local/html/Callbacks/SSO/NoAuth/Logout.html/BeforeSessionDelete and add the appropriate logout endpoints (note the callout function override is identified as a file) Window.location.replace() preserves the referrer headers so everything should line up properly.
<script type="text/javascript"> window.location.replace("/auth/logout?ReturnTo=/NoAuth/Login.html") </script>
One thing to note: the Logout URLs need to reflect your RT’s logon page as the final response URL in ADFS, otherwise ADFS won’t redirect properly to the RT login page.
- The Trusted URL is the referrer of a logout request that will come from the SP to initiate logout
- Response URL is the referral the ADFS server will return to the browser to complete the logout (this should be /NoAuth/Login.html to allow re-logins to the app)
References and More information
Some references that helped with the creation of this
https://mattslifebytes.com/tag/mod_auth_mellon/ General intro to Mellon with examples
https://github.com/Uninett/mod_auth_mellon/wiki/GenericSetup Mellon’s official basic setup article

